Painting a room may seem straightforward, but the preparation process is as important as the painting.
Taking the time to properly prepare your room can make the difference between a seamless, professional-looking finish and a messy, lackluster result. Here are seven essential tips to help you get your room painting-ready.
Clear the Room of Furniture and Decorations
The first step in preparing a room for painting is to clear it of all furniture, decorations, and other items. This includes large pieces of furniture and smaller items like lamps or artwork that could get in the way. Not only does this prevent accidental paint splatters on your belongings, but it also gives you more space to work in.
Remove Wall Hangings and Fixtures
Next, take down any wall hangings or fixtures, such as curtain rods or light switch plates. This will make painting easier and prevent accidental damage to these items. Place them in a safe location away from the painting area.
Clean and Dust All Surfaces
Before painting, it’s important to clean and dust all surfaces to ensure a smooth and even paint application. Wipe down walls, trim, and baseboards with a damp cloth, or use a mild cleaner for tougher stains. Don’t forget to also dust any ceiling fixtures or vents.
Patch and Repair Holes or Cracks
Inspect the walls and look for any holes, cracks, or imperfections. Use spackling compound to fill in these areas and sand them down until smooth. This will ensure a flawless finish once the paint is applied.
Wash Walls and Trim Surfaces
Washing walls and trim surfaces before painting is an important step in ensuring a smooth and professional-looking finish. This process removes dirt, grime, and any other build-up that can affect the paint’s adhesion to the surface. Here are some tips for preparing your walls and trim surfaces for painting:
- Use a mild detergent or dish soap – Mix a small amount of mild detergent or dish soap with warm water to create a cleaning solution. This will help remove dirt, grease, or other residue from the walls and trim surfaces.
- Start from the top – When washing your walls and trim surfaces, it’s best to start from the top and work your way down. This will prevent dirty water from dripping onto areas that have already been cleaned.
- Use a sponge or soft cloth – Avoid using abrasive materials such as scrub brushes, which can damage the surface and create an uneven texture. Instead, use a soft sponge or cloth to clean the walls and trim surfaces gently.
- Rinse with clean water – After washing, rinse any cleaning solution with clean water. This will ensure that no residue is left behind.
- Wipe dry with a towel – Use a clean towel to wipe down the walls and trim surfaces after rinsing. This will help remove excess water and ensure the surfaces are completely dry before painting.
Tape Off Corners and Floor Areas
Taping off corners and floor areas is essential in preparing a room for painting. This will help protect these areas from accidental paint splatters or drips and ensure clean and crisp lines along the edges. Here are some tips for effectively taping off corners and floor areas, according to professionals at https://groovyhues.com/.
- Use painter’s tape – Painter’s tape is designed to be easy to apply and remove without leaving residue or damaging surfaces. Avoid using regular masking tape, as it can be too strong and may damage the surface when removed.
- Clean the area – Before applying the painter’s tape, clean the corners and floor areas with a mild detergent or dish soap to remove dust or grime.
- Apply in sections – It’s best to apply painter’s tape in sections rather than trying to cover the entire area simultaneously. This will make it easier to handle and ensure a more precise application.
- Press down firmly – After applying the tape, use your fingers or a putty knife to press down firmly along the edges. This will help create a tight seal and prevent paint from bleeding.
- Remove at a 45-degree angle – When removing the painter’s tape, do so at a 45-degree angle to prevent any paint from peeling off with it.
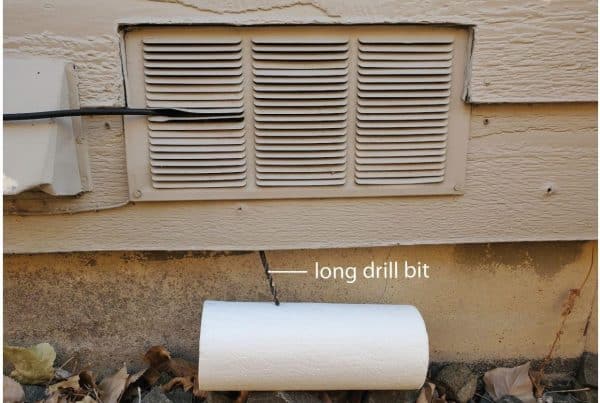
Cover Vents, Windowsills, Outlets and Switch Plates
When painting a room, it’s important to protect any fixtures or surfaces that you don’t want to get paint on. This includes vents, windowsills, outlets, and switch plates. You can protect them by covering them with plastic or painter’s tape. This will save you time and effort in cleaning up any accidental paint drips.
Conclusion
Following these tips, you can effectively prepare a room for painting and ensure a professional-looking finish. From repairing holes and cracks to washing walls and trim surfaces, taping off corners and floor areas, and covering vents, windowsills, outlets, and switch plates, taking the time to properly prepare a room will result in a smooth and successful painting project. Remember to also choose high-quality paint and use the proper tools, such as brushes and rollers.