Installing a new roof is a significant home project that requires careful company research, preparation, and plan of action. This step-by-step guide we have written is here to provide you with a comprehensive overview of the process involved in installing a new roof. We also go into material costs and other important information in order to equip you with the knowledge necessary to make informed decisions.
If you are wanting to start your roof project, we do recommend to contact a local roofing contractor, a roof installation can be hard work for one or two people and there are a lot of factors and materials that go into place, which is why we strongly advise to get a roof inspection and quote from a roofer or two.
Step-by-Step Installation Process
Step 1: Planning and Preparation
Start by assessing the existing roof condition, make sure that the roof deck does not have any damage or need any plywood replacements.Obtain any necessary permits and approvals. Depending on the state you live in and project at hand, you might need these in order to start your project. If you have an Homeowners Association (HOA), get in contact with them. We have seen in the past that some HOA’s require certain shingle colors or specifications depending on the neighborhood.
Take accurate measurements and determine which materials are being installed before starting. Make sure the colors and specifications are what you want. For example, some homeowners opt for the regular ice and water shield underlayments and others prefer a higher end one. We recommend asking your contractor before starting and if you want to make any upgrades.
Step 2: Roof Deck Preparation
Now that your roofing contractor has removed all the materials sitting on top of your roof, he can take a look at the base or roof deck. He will inspect and repair or replace part of the roof deck to make sure that the base is in good shape and not be susceptible to any leaks or condensation later down the road.
The next step includes installing the underlayment for moisture protection and the first layer of the roof.
Step 3: Flashing and Ventilation
Step 3 includes installation of flashing around the edges, valleys, and penetrations of your roof. Flashing is important to make sure that water is unable to get in from any small or open areas. It also helps to make sure that there is proper ventilation and moisture is not able to build.
Step 4: Installing Roofing Materials
Step four is the big part where we start to lay down the starter shingles. Starting at the eaves of a roof, or the overhang or end of your roof, begin by laying down the starter shingles. Starter shingles are used to create a seal at the edges and make sure that the underlayments are in perfect place and closely sealed. These have a self-adhesive layer on the bottom and help prevent moisture and shingles from curling. This is an important step to a perfect roof installation.
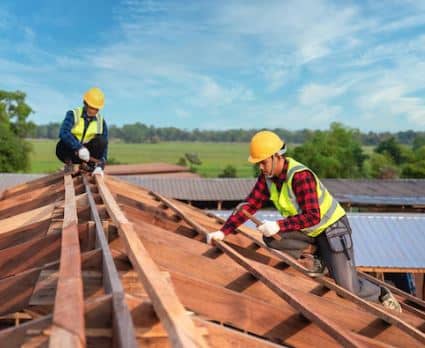
Once the starter strips have been placed, the next phase is putting the actual shingles down. These shingles are of the homeowner’s choosing and can be simple dimensional shingles or luxury ones. Depending on the shingle specifications, there might be some minor differences in installation. Some require four nails per shingle and others require six, this also depends on the roofing contractor but in our experience, we always install six nails per shingle to be on the safer side. Shingle installation requires 3-6 installers, depending on the size of the roof.
Steeper roofs also require more careful consideration as it is more dangerous to walk on steeper roofs. Your roofing contractor provides a careful project completion date and should provide updates throughout the day. One to two days is the norm for roof installs.
Step 5: Ridge Cap Installation
Installation of the ridge caps is the last step of your roof installation. The ridge cap is similar to a regular shingle and is the same color however, its designed to be installed over the highest point of your roof. Ridge caps are usually pre-bent and slightly thicker than asphalt shingles.
Your ridge vent has a gap for air to circulate throughout the house, and the ridge caps go over this to ensure that no rain or snow gets through. It also helps with moisture.
Step 6: Clean-up and Final Walkthrough
Your roofing contractor is responsible for removing debris and ensuring your house and landscape is clean and spotless. A good roofer will, at the end, perform a thorough inspection to make sure that everything is in good standing and there are no issues.
Pricing Factors of Your Roof Installation
Material Costs: Breakdown of material costs based on the chosen roofing materials, such as the shingle type, underlayment and flashing installations.
Labor Costs: Consist of the steepness of your roof, size, height and location.
Additional Costs: Permit fees, disposal fees, and other miscellaneous expenses to consider. If there are other costs that were not included but necessary for the installation, the roofing contractor should explain in advance.
Roofing Materials
1. Asphalt Shingles
Asphalt shingles are the most common roofing material, known for their affordability and durability. There are different tiers and with these, different prices. Strip shingles, dimensional and luxury are all available and great options for homeowners. Depending on the desired outcome of the project and budget, you can’t go wrong with what over 80% of homeowners already have installed on top of their homes.
Price Range: $3.00 to $5.50 per square foot. Prices will vary based on the brand and type of shingle. For example, a standard type of shingle will be on the lower end price range and a luxury or higher end shingle will cost more due to additional features.
Pros: Cost-effective, easy to install, wide range of colors and styles to choose from/
Cons: Moderate lifespan (20 to 30 years), algae and moss can grow on it. Harsher wind storms can loosen and cause damage to the shingles.
2. Metal Roofing
Metal roofing offers longevity and exceptional weather resistance. Metal roofs also need less maintenance than other types of roofing materials, are extremely strong against strong winds, and fire resistant. Their
Price Range: $5.00 to $12.00 per square foot.
Pros: Long lifespan (50+ years), fire-resistant, energy-efficient, more environmentally friendly than other materials.
Cons: Higher upfront cost, professional installation required, can dent from extreme weather and hail damage.

3. Clay Tiles
Clay tiles provide a classic appearance, although they are not normally used for residential homes in the midwest. Clay is mostly used in states where its sunny year round and not a lot of rain.
Price Range: $10.00 to $20.00 per square foot.
Pros: Exceptional durability, energy-efficient and fire-resistant. Provides a great aesthetic for a home or commercial building.
Cons: It can be heavy, requires a reinforced roof structure, higher costs of installation.
4. Slate Roofing
Slate roofing is made from natural stone and is waterproof and durable while looking timeless. Not to mention, slate roofing materials are the longest lasting materials out of all roofing options. There are different designs to choose from, such as the standard style, textural and multicolored options. You can’t go wrong with Glendyne Inc, Newmont Slate Company or New England Slate for your slate material manufacturer.
Price Range: $20.00 to $35.00 per square foot.
Pros: Long lifespan (50 – 200+ years), fire-resistant, low maintenance, resistant to insects, and environmentally friendly.
Cons: Very expensive, requires specialized installation, is very heavy, can be slippery to walk on.
Conclusion
We hope this step by step installation guide helps homeowners see a clearer picture of what roofing contractors do on a daily basis and what your next home project could look like. After all, a roof installation is a big project that is not cheap, and it’s easy to see why. Now that you have more knowledge of the ins and outs of your roof and how different factors can affect the price, you are ready to spring into action and get started on your installation.